About a year ago we decided to build a treehouse into our walnut.
So I kept my eyes open to see how others build their tree-houses. And finally on our last trip I found a way to get it done. I had a look at how the platforms on a high-rope-garden had been build and it seemed rather easy. Take two wooden beams, drill a hole on each side, connect them with threaded rods and tighten. The beams will then clamp around the trees trunk and hold tight. Add that setup right on top of the first one rotated by 90 degrees with longer beams so they can be used to add planks on top. Might sound complicated but it’s rather easy. 
At least it’s easy when you have a straight, upright tree. At least that’s what I had to find out the hard way. Our walnut is everything but straight and upright. I struggled a while trying to get the beams halfway parallel to the ground. Until I finally gave up and had to think up something else. The idea of clamping the platform for the treehouse onto the tree was great, but it didn’t work out to use that technique to support the platform from below.
So after a week of thinking it through I decided to try a different way. When I can’t support the platform from below, I might be more lucky suspending it!
So I looked for a rather upright part of the tree and clamped two beams onto that and added two more above rotated. And on top of that I took 4 stainless steel-ropes around the tree.

Then I built the supporting base at the foot of the tree from 8x12cm wooden beams with 3,2 m length each. The 2 main beams got each 2 holes drilled right through through which I took the steel-ropes. The I hauled the thing up using some supporting ropes to get it to the final height and secured everything with the steel ropes. Base support hanging!
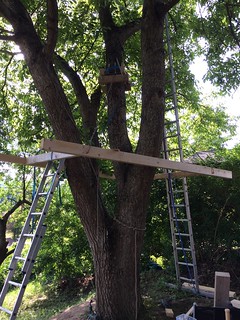
And from there on it was just a matter of “just do it”. Adding the remaining beams and putting the flooring onto those with cutouts for the tree was then the fun thing to do.
The next thing will be the walls and a partial roof to make it possible to enjoy some rain out there. But that might then become another story.
More images are available at hei.gl/treehouse